Managing Named Assureds
In This Topic...
Creating a New Named Assured
Why would I create a new named assured?
When the necessary named assured does not appear in the shipment’s list of available named assureds (meaning it does not exist in the system yet or you do not have access to it) and / or you need to create a named assured needed for the current shipment but does not need to be available every time you are creating a new shipment.
Before Getting Started
- You are creating a new shipment or modifying a saved shipment from the Shipment screen.
- You are assigned the Manage Assured security right.
Steps
-
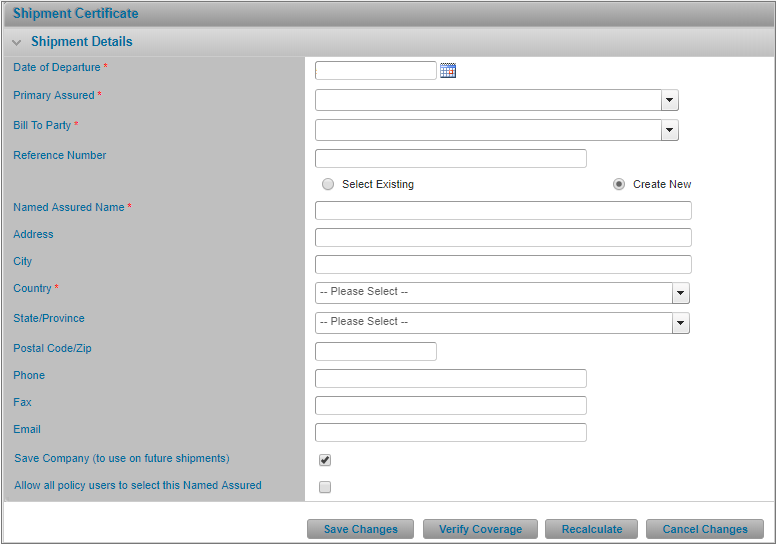
In the Shipment Details panel of the Shipment Certificate screen, above the Named Assured Name field, select the Create New option. The system displays additional fields where you specify the named assured’s details.
- Enter the named assured’s required details such as Named Assured Name and Country along with any other relevant contact details.
- Continue creating a new shipment or modifying an existing shipment.
- Click Save Changes to save the named assured's details and remain on the Shipment Certificate screen and continue modifying the shipment. Click Verify Coverage when you are finished editing the named assured's details. Click Recalculate to recalculate the shipment with the new details, or click Cancel Changes to return to the Shipment Certificate screen where the fields are read-only.
Result
The new named assured is created for the shipment when you click Save Changes.
Note: The new Named Assured is only created for the current shipment and gets saved when you book the shipment.
Saving a New Named Assured
Why would I save a new named assured?
To make the new Named Assured available for reuse on future shipments.
Before Getting Started
- You are creating a new shipment or modifying a saved shipment from the Shipment screen.
- You are assigned the Manage Assured security right.
Steps
-
In the Shipment Details panel, above the Named Assured Name field, select Create New. Enter at minimum, the required fields. Fields marked with a red asterisk * are required.
- Check the Save Company (to use on future shipments) checkbox. The system displays an additional checkbox.
- Check Allow all policy users to select the Named Assured checkbox if you want to make the named assured available to other users creating shipments for this policy using the same Primary Assured you selected.
- Continue creating a new shipment or modifying an existing shipment.
Result
The new Named Assured will be added to the list of possible named assureds you can select from when creating new shipments. Optionally, the new named assured will be available to other users creating shipments for the same policy, depending on your selection.
Modifying a Named Assured via the Shipment Form
Why would I modify a named assured from the shipment screen?
To update or correct a named assured’s details from the shipment form directly. This way you do not need to navigate to the Assured section to manage the additional named assured.
Note: Any changes you make to the Named Assured company from the Shipment Form will apply to the company going forward.
Before Getting Started
- You are creating a new shipment or modifying a saved shipment from the Shipment screen.
- You are assigned the Manage Assured security right.
Steps
- Navigate to the Shipment Details panel.
-
Click the Named Assured Details hyperlink appearing just under the Select Named Assured field. You must have already selected a named assured for the shipment and have the appropriate security right in order to see this link.
- Modify the named assured’s details as required. Fields marked with a red asterisk * are required.
- Click Save.
Result
The system saves your changes.
Modifying Named Assured Details via the Shipment Form
Why would I modify a named assured from the shipment screen?
To update or correct a named assured’s details from the shipment form directly. This way you do not need to navigate to the Assured section to manage the additional named assured.
Note: Any changes you make to the Named Assured company from the Shipment Form will apply to the company going forward.
Before Getting Started
- You are creating a new shipment or modifying a saved shipment from the Shipment screen.
- You are assigned the Manage Assured security right.
Steps
-
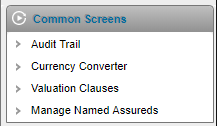
Click the Manage Named Assureds link in the Common Screens widget on the right side of the screen to modify a Named Assured not selected on the enabled shipment.
Some columns have been hidden.
- Click View Details for the Named Assured you wish to modify.
- Modify the details as required.
- Click Save to update the named assured and remain on the page, Save and New if you wish to add a new named assured without returning to the Named Assured list, Save and Close if you are done updating the named assureds, or Close to return to the Named Assured list without saving the changes.
Result
The system saves your changes.


